
What is PNF stretching, and will it improve my flexibility?
10almonds is reader-supported. We may, at no cost to you, receive a portion of sales if you purchase a product through a link in this article.
Whether improving your flexibility was one of your new year’s resolutions, or you’ve been inspired watching certain tennis stars warming up at the Australian Open, maybe 2025 has you keen to focus on regular stretching.
However, a quick Google search might leave you overwhelmed by all the different stretching techniques. There’s static stretching and dynamic stretching, which can be regarded as the main types of stretching.
But there are also some other potentially lesser known types of stretching, such as PNF stretching. So if you’ve come across PNF stretching and it piques your interest, what do you need to know?

What is PNF stretching?
PNF stretching stands for proprioceptive neuromuscular facilitation. It was developed in the 1940s in the United States by neurologist Herman Kabat and physical therapists Margaret Knott and Dorothy Voss.
PNF stretching was initially designed to help patients with neurological conditions that affect the movement of muscles, such as polio and multiple sclerosis.
By the 1970s, its popularity had seen PNF stretching expand beyond the clinic and into the sporting arena where it was used by athletes and fitness enthusiasts during their warm-up and to improve their flexibility.
Although the specifics have evolved over time, PNF essentially combines static stretching (where a muscle is held in a lengthened position for a short period of time) with isometric muscle contractions (where the muscle produces force without changing length).
PNF stretching is typically performed with the help of a partner.
There are 2 main types
The two most common types of PNF stretching are the “contract-relax” and “contract-relax-agonist-contract” methods.
The contract-relax method involves putting a muscle into a stretched position, followed immediately by an isometric contraction of the same muscle. When the person stops contracting, the muscle is then moved into a deeper stretch before the process is repeated.
For example, to improve your hamstring flexibility, you could lie down and get a partner to lift your leg up just to the point where you begin to feel a stretch in the back of your thigh.
Once this sensation eases, attempt to push your leg back towards the ground as your partner resists the movement. After this, your partner should now be able to lift your leg up slightly higher than before until you feel the same stretching sensation.
This technique was based on the premise that the contracted muscle would fall “electrically silent” following the isometric contraction and therefore not offer its usual level of resistance to further stretching (called “autogenic inhibition”). The contract-relax method attempts to exploit this brief window to create a deeper stretch than would otherwise be possible without the prior muscle contraction.
The contract-relax-agonist-contract method is similar. But after the isometric contraction of the stretched muscle, you perform an additional contraction of the muscle group opposing the muscle being stretched (referred to as the “agonist” muscle), before the muscle is moved into a static stretch once more.
Again, if you’re trying to improve hamstring flexibility, immediately after trying to push your leg towards the ground you would attempt to lift it back towards the ceiling (this bit without partner resistance). You would do this by contracting the muscles on the front of the thigh (the quadriceps, the agonist muscle in this case).
Likewise, after this, your partner should be able to lift your leg up slightly higher than before.
The contract-relax-agonist-contract method is said to take advantage of a phenomenon known as “reciprocal inhibition.” This is where contracting the muscle group opposite that of the muscle being stretched leads to a short period of reduced activation of the stretched muscle, allowing the muscle to stretch further than normal.
What does the evidence say?
Research has shown PNF stretching is associated with improved flexibility.
While it has been suggested that both PNF methods improve flexibility via changes in nervous system function, research suggests they may simply improve our ability to tolerate stretching.
It’s worth noting most of the research on PNF stretching and flexibility has focused on healthy populations. This makes it difficult to provide evidence-based recommendations for people with clinical conditions.
And it may not be the most effective method if you’re looking to improve your flexibility in the long term. A 2018 review found static stretching was better for improving flexibility compared to PNF stretching. But other research has found it could offer greater immediate benefits for flexibility than static stretching.
At present, similar to other types of stretching, research linking PNF stretching to injury prevention and improved athletic performance is relatively inconclusive.
PNF stretching may actually lead to small temporary deficits in performance of strength, power, and speed-based activities if performed immediately beforehand. So it’s probably best done after exercise or as a part of a standalone flexibility session.

How much should you do?
It appears that a single contract-relax or contract-relax-agonist-contract repetition per muscle, performed twice per week, is enough to improve flexibility.
The contraction itself doesn’t need to be hard and forceful – only about 20% of your maximal effort should suffice. The contraction should be held for at least three seconds, while the static stretching component should be maintained until the stretching sensation eases.
So PNF stretching is potentially a more time-efficient way to improve flexibility, compared to, for example, static stretching. In a recent study we found four minutes of static stretching per muscle during a single session is optimal for an immediate improvement in flexibility.
Is PNF stretching the right choice for me?
Providing you have a partner who can help you, PNF stretching could be a good option. It might also provide a faster way to become more flexible for those who are time poor.
However, if you’re about to perform any activities that require strength, power, or speed, it may be wise to limit PNF stretching to afterwards to avoid any potential deficits in performance.
Lewis Ingram, Lecturer in Physiotherapy, University of South Australia and Hunter Bennett, Lecturer in Exercise Science, University of South Australia
This article is republished from The Conversation under a Creative Commons license. Read the original article.
Don’t Forget…
Did you arrive here from our newsletter? Don’t forget to return to the email to continue learning!

Learn to Age Gracefully
Join the 98k+ American women taking control of their health & aging with our 100% free (and fun!) daily emails:
-

The Most Dangerous Ingredients That Aren’t In Your Vape Device (Until You Use It)

10almonds is reader-supported. We may, at no cost to you, receive a portion of sales if you purchase a product through a link in this article.
“No, officer, there are no explosives in this house” says the bomb-maker, truthfully, on account of keeping the ingredients in separate containers to be combined later.
In a similar vein, there are two very toxic substances that aren’t in vapes, and so don’t need to go on any labels, but get created inside the vape once heated.
And them, the newly-created chemicals, that weren’t there when you bought it, go into your lungs.
Spoiler: what they do there is not good
The last place you want a chemical factory to be is in front of your face
In few words: heating the main ingredient in most e-cigarette fluids—propylene glycol—creates two toxic chemicals, methylglyoxal and acetaldehyde, which are very harmful to human lung cells.
Both of these latter two chemicals disrupt key cell functions, but of the two methylglyoxal is the most damaging even at lower concentrations; it impairs mitochondria (famously: the cell’s energy-givers) and weakens the actin cytoskeleton, compromising cell shape and stability.
In case “the actin cytoskeleton” sounds like something that might be encountered as a monster in a Dungeons & Dragons game, we’ll take a moment to clarify:
- actin = a specialized kind of protein
- cyto = of or relating to cells
- skeleton = the most dry part that gives structure to the wetter parts
So, “actin cytoskeleton” = the relatively tougher protein structure that helps a cell to stay the shape it’s supposed to be
…until methylglyoxal comes along and starts breaking it down, that is.
And it’s worth bearing in mind also that lower-powered e-cigarettes—which many users assume are safer—usually generate higher levels of methylglyoxal.
Here’s the paper itself: Acetaldehyde and methylglyoxal: comparative analysis of toxic electronic cigarette degradation products in 3D and 2D exposure systems using human bronchial epithelial models
And here’s a pop-science article about it, that’s lighter reading than the paper, while also having a little more background information: Hidden toxins in vapes can harm lung cells
There are also other “bonus chemicals” from disposable vapes specifically, insofar as the chemicals you will inhale were (again) not included as ingredients, and in this case, they came from the heating element itself:
❝To place the potential for Pb exposure in the context of traditional cigarettes, Figure 3B compares the mass of Pb in a pack of traditional cigarettes (20 cigarettes) to the mass of Pb of a comparable nicotine dose from the Esco Bar devices.
In comparison to the highest Pb delivery measured for traditional cigarettes, on average Esco Bar devices (Flavored and Clear) emitted ∼4 to 13 times more Pb (4.9 and 15.4 μg, respectively) in the first 200 puffs than the highest reported for a pack of cigarettes (20 cigarettes; 1.2 μg).
For context, this level of Pb exposure is equivalent to smoking as many as 19 packs of cigarettes in a single day.❞
Pb = lead, as in the heavy metal of that name
Read in full: Guess How Much Lead Is Released By Disposable Vapes
Of course, even the base ingredients aren’t great either
While they indeed become much worse once turned into methylglyoxal and acetaldehyde, even the raw ingredients are Not Good™, for example:
- Potential harmful health effects of inhaling nicotine-free shisha-pen vapor: a chemical risk assessment of the main components propylene glycol and glycerol
- Inflammatory and Oxidative Responses Induced by Exposure to Commonly Used e-Cigarette Flavoring Chemicals and Flavored e-Liquids without Nicotine
So, the substrate itself can cause irritation, and flavorings (with cinnamaldehyde, the cinnamon flavoring, being one of the worst) can really mess with our body’s inflammatory and oxidative responses.
You can read more about this in our main feature on vaping, here:
Vaping: A Lot Of Hot Air? ← this also looks at which is worst, out of vaping and smoking (both are very bad, but can you guess which is relatively worst?)
Share This Post
-
Fall Asleep In 2 Minutes (Doctor Explains)
10almonds is reader-supported. We may, at no cost to you, receive a portion of sales if you purchase a product through a link in this article.
Beyond “sleep hygiene”, Dr. Siobhan Deshauer has insights to share:
Rest for your body and mind
First, do still do the basics. That means dimming/filtering lights for an hour before bed, lowering the room temperature a little, ensuring you have nice fresh sheets, not having alcohol or caffeine before bed, and getting out of bed if you’re not asleep within half an hour, to avoid associating being in bed with wakefulness.
Next, the extra tips:
- Progressive relaxation: tense and relax each muscle group from toes to head
- Box breathing: inhale, hold, exhale, and hold for 4 seconds each; helps calm the nervous system (it’s called “box breathing” because of the 4:4:4:4 setup)
- Diaphragmatic breathing: focus on belly breathing, with longer exhalation to activate the parasympathetic nervous system (note that this can, and even ideally should, be done at the same time as the previous)
- Cognitive shuffling: think of words starting with each letter of a chosen word while visualizing them (this is like “counting sheep”, but does the job better—the job in question being preventing your brain from moving to anything more strenuous or stressful)
For more on all of these plus some extra side-along advice, enjoy:
Click Here If The Embedded Video Doesn’t Load Automatically!
Want to learn more?
You might also like to read:
Non-Sleep Deep Rest: A Neurobiologist’s Take ← a way to get many of the benefits of sleep, while awake
Take care!
Share This Post
-

Compact Tai Chi – by Dr. Jesse Tsao
10almonds is reader-supported. We may, at no cost to you, receive a portion of sales if you purchase a product through a link in this article.
A very frustrating thing when practicing tai chi, especially when learning, is the space typically required. We take a step this way and lunge that way and turn and now we’ve kicked a bookcase. Add a sword, and it’s goodnight to the light fixtures at the very least.
While a popular suggestion may be “do it outside”, we do not all have the luxury of living in a suitable climate. We also may prefer to practice in private, with no pressing urge to have an audience.
Tsao’s book, therefore, is very welcome. But how does he do it? The very notion of constriction is antithetical to tai chi, after all.
He takes the traditional forms, keeps the movements mostly the same, and simply changes the order of them. This way, the practitioner revolves around a central point. Occasionally, a movement will become a smaller circle than it was, but never in any way that would constrict movement.
Of course, an obvious question for any such book is “can one learn this from a book?” and the answer is complex, but we would lean towards yes, and insofar as one can learn any physical art from a book, this one does a fine job. It helps that it builds up progressively, too.
All in all, this book is a great choice for anyone who’s interested in taking up tai chi, and/but would like to do so without leaving their home.
Share This Post


-
How tubal ligation prevents pregnancy
10almonds is reader-supported. We may, at no cost to you, receive a portion of sales if you purchase a product through a link in this article.
In February, a Michigan state representative spoke out about undergoing surgery to prevent pregnancy. Her speech prompted questions about procedures like tubal ligation, sometimes called “getting your tubes tied,” which is increasingly common in states with abortion bans.
It’s a safe and highly effective procedure, and unlike most forms of birth control, it permanently prevents pregnancy.
Read on to learn how tubal ligation works, what to expect if you get one, and more.
How does tubal ligation prevent pregnancy?
During a tubal ligation surgery, a doctor cuts or ties the fallopian tubes, which stops your eggs from entering the uterus. This also stops sperm from traveling through the fallopian tubes to fertilize the eggs.
Is tubal ligation permanent?
Tubal ligation is meant to be permanent. Sometimes it’s possible to reverse the procedure, but this can be an expensive and complicated surgery.
“A limited number of physicians do that, and it doesn’t always work,” said Dr. Erica Schipper, an OB-GYN at Sanford Health, on a recent podcast. “So, I do tell my patients, ‘You should be very sure that you want a permanent form of contraception if you go ahead with this.’”
What should you expect during and after a tubal ligation?
If you’re undergoing a tubal ligation, you can expect to receive general anesthesia to sleep through the procedure, which takes 20 to 30 minutes to complete. It’s usually a laparoscopic surgery, a minimally invasive procedure to see inside your abdomen using a camera. Afterward, you might feel groggy and experience some pain.
Most people recover within a couple of days, but you should avoid lifting anything heavier than 12 pounds for a week after the procedure and avoid swimming or taking baths for at least two weeks. You may experience vaginal bleeding for up to one month after surgery.
Doctors typically advise patients to wait at least one week after the procedure before having sex. This allows the surgical site to heal and reduces the risk of infection.
Some patients may opt to get their tubes tied during a cesarean, or C-section. In this case, the surgeon uses the incision that was made in the abdomen to deliver the baby to access the fallopian tubes. After a C-section, most people stay in the hospital for two to three days before recovering fully at home in four to six weeks.
How effective is it?
Tubal ligation is more than 99 percent effective at preventing pregnancy.
If you’re not ready for permanent birth control, there are other highly effective options. Getting an intrauterine device, or an IUD, is also more than 99 percent effective at preventing pregnancy and lasts for several years. A health care provider can remove your IUD if you want to get pregnant.
Learn about other forms of birth control from Planned Parenthood.
What are the risks?
Getting your tubes tied is safe, but like all surgeries, it comes with some risks, like infection of the surgical site or allergic reaction to anesthesia.
“Any risk that comes with any laparoscopic surgery comes with this one,” Schipper added. “That said, this is a procedure that is done quite frequently and usually goes very well.”
Where can you get a tubal ligation?
You can get a tubal ligation at a health care provider’s office, hospital, or health clinic like Planned Parenthood.
How much does it cost?
Depending on your health insurance, tubal ligation can cost anywhere from $0 to $6,000, including follow-up visits.
If you’re worried about affording the procedure, contact your local Planned Parenthood to learn about free or lower-cost forms of birth control.
What barriers may people face when seeking a tubal ligation?
Some patients struggle to get a tubal ligation due to cost, appointment shortages, opposition from partners, and health care providers who are reluctant to perform the surgery on younger patients.
“I will routinely see patients that have been denied by other people because of, ‘Ah, you might want to have kids in the future.’ ‘You don’t have enough kids.’ ‘Are you sure you want to do this? It’s not reversible,’” said Dr. Alexis O’Leary, a Helena, Montana, OB-GYN in a June 2024 article from KFF Health News. If your health care provider is unwilling to perform a tubal ligation, see another provider or visit your local Planned Parenthood.
If you are unable to access a tubal ligation, discuss other birth control options with your health care provider. You can also talk to your partner about getting a vasectomy, if this applies to them. This minor surgical procedure for people with penises stops them from releasing sperm into semen, thus avoiding pregnancy. Vasectomies are meant to be permanent, and the procedure is less invasive and less expensive than a tubal ligation.
For more information, talk to your health care provider.
This article first appeared on Public Good News and is republished here under a Creative Commons Attribution-NoDerivatives 4.0 International License.
Don’t Forget…
Did you arrive here from our newsletter? Don’t forget to return to the email to continue learning!
Learn to Age Gracefully
Join the 98k+ American women taking control of their health & aging with our 100% free (and fun!) daily emails:
-

Eat Better, Feel Better – by Giada de Laurentis
10almonds is reader-supported. We may, at no cost to you, receive a portion of sales if you purchase a product through a link in this article.
In yesterday’s edition of 10almonds, we reviewed Dr. Aujla’s “The Doctor’s Kitchen“; today we’re reviewing a different book about healing through food—in this case, with a special focus on maintaining energy and good health as we get older.
De Laurentis may not be a medical doctor, but she is a TV chef, and not only holds a lot of influence, but also has access to a lot of celebrity doctors and such; that’s reflected a lot in her style and approach here.
The recipes are clear and easy to follow; well-illustrated and nicely laid-out.
This cookbook’s style is less “enjoy this hearty dish of rice and beans with these herbs and spices” and more “you can serve your steak salad with white beans and sweet shallot dressing on a bed of organic quinoa if you haven’t already had your day’s serving of grains, of course”.
It’s a little fancier, in short, and more focused on what to cut out, than what to include. On account of that, this could make it a good contrast to yesterday’s book, which had the opposite focus.
She also recommends assorted adjuvant practices; some that are evidence-based, like intermittent fasting and meditation, and some that are not, like extreme detox-dieting, and acupuncture (which has no bearing on gut health).
Bottom line: if you like the idea of eating for good health, and prefer a touch of celebrity lifestyle to your meals, this one’s a good book for you.
Don’t Forget…
Did you arrive here from our newsletter? Don’t forget to return to the email to continue learning!
Learn to Age Gracefully
Join the 98k+ American women taking control of their health & aging with our 100% free (and fun!) daily emails:
-
How can I get water out of my ear after swimming?
10almonds is reader-supported. We may, at no cost to you, receive a portion of sales if you purchase a product through a link in this article.
Swimming is one of the best parts of summer. But long after you’ve cooled down and dried off, you might be left with a niggling feeling – there is still water in your ear.
Your ear may feel full or blocked and sounds may be muffled. You may even hear some gurgling or rustling noises.
While water usually drains naturally, a few tips can help speed things up and prevent swimmer’s ear, a common infection after swimming.

Rhett Noonan/Unsplash Why water gets stuck
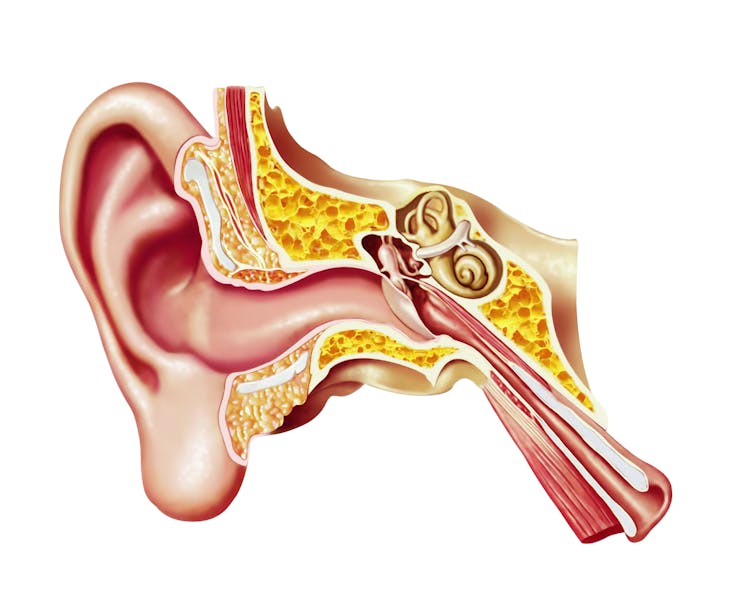
You might think your ear canal is a straight tube, but it’s not. It bends twice, and some people’s canals are naturally narrower than others.
The ear canal is lined with hair and wax for protection. It can also develop extra bone growth (exostoses) from years of cold-water swimming, sometimes known as “surfer’s ear”, which can make it even narrower.
When you swim, water can easily get past all these curves and barriers when you dip your head under water or get splashed. But getting it out afterwards can be tricky.
The ear canal bends twice and is naturally narrower in some people. Leonello Calvetti/Stocktreck Images/Getty Try the simplest things first
Wiggle and tilt
Gently tug your earlobe up and down while tipping the blocked ear towards your shoulder. This straightens the ear canal and lets gravity help drain water out.
Lie on your side
Lay on your side on a towel for a few minutes, then roll over to the other side. Gravity will help again. In summer, warmth from the sun and towel can also help water in the ear dry faster.
Cup and pump
Press your slightly cupped palm over your ear to form a seal, then gently push and release to create a vacuum effect. You can also press the tragus (the firm skin in front of your ear canal) over the opening of your ear canal several times to encourage movement and drainage.
The tragus is the small cartilage flap covering the ear canal’s opening. Kindel Media/Pexels Do I need ear drops?
If none of these tips have worked so far, you might need some ear drops designed to dry out your ears.
Typically, these contain alcohol, which helps water evaporate faster. You can get these over the counter from a pharmacy.
But be sure to read the instructions, and don’t use them if you have any ear pain, discharge, an ear infection or a hole in your eardrum (or grommets, which are tiny tubes surgically inserted in the eardrum).
Some people make their own drops, using a solution of rubbing alcohol and white vinegar in equal proportions. This makes the ear canal more acidic, which can help prevent bacteria and fungal growth.
Be cautious when you use your own drops (again, don’t use them if you think you have a hole in your eardrum) and only use a few drops in each ear.
What not to do
Never put anything in your ears – even fingers or the tip of a towel can push water, wax and anything else trapped in your ear deeper and worsen the problem.
You might also scratch the delicate canal skin, increasing infection risk.
Avoid cotton buds and stick to the tips above.
Is trapped water dangerous?
Many people find the feeling annoying. But warm, moist places are also ideal for bacteria and fungi, so water trapped in the ear canal can lead to swimmer’s ear (otitis externa).
Symptoms include pain when moving the outer ear (the bit you can see), itchiness, discharge, redness or swelling, and sometimes fever.
Around one in ten people experience it at some point in their lives, most often during summer, and kids aged 7–14 are at higher risk.
If you suspect you have swimmer’s ear, it is important to see a medical professional as you will likely need treatment (typically antibiotic drops and pain relief).
Avoid swimming after storms or in polluted water, which carries more bacteria.
Freshwater sources such as rivers and lakes pose greater risk than salty ocean water, while properly chlorinated pools are generally pretty safe.
How to avoid it and when to seek help
If you don’t like the feeling after swimming – or you frequently get water trapped in your ears – invest in a swim cap or some ear plugs. Audiologists can help you find or customise earplugs to fit your ears.
Prioritise drying out ears once you are finished swimming, and use some of the tips above. For kids, making it into a game can help.
If an ear feels painful, inflamed or looks swollen, there might be an ear infection and it’s best to seek advice and attention from your GP.
If you still feel like you have water in your ears after two to three days, it’s best to also get it checked out.
Peter Carew, Senior Lecturer in Audiology, The University of Melbourne; Murdoch Children’s Research Institute
This article is republished from The Conversation under a Creative Commons license. Read the original article.
Don’t Forget…
Did you arrive here from our newsletter? Don’t forget to return to the email to continue learning!
Learn to Age Gracefully
Join the 98k+ American women taking control of their health & aging with our 100% free (and fun!) daily emails: