
Professional-Style Dental Cleaning At Home?
10almonds is reader-supported. We may, at no cost to you, receive a portion of sales if you purchase a product through a link in this article.

You know the scene: your dentist is rummaging around inside your mouth with an implement that looks like a medieval torture device; you wince at a sudden sharp pain, only to be told “if you flossed, you wouldn’t be bleeding now”.
For most of us, going to the dentist isn’t near the top of our “favorite things to do” list, but it is of course a necessity of (healthy) life.
So, what can we do to minimize suffering in the dentist’s chair?
First, the basics
Of course, good oral hygiene is the absolute baseline, but with so many choices out there, which is best? We examined an array of options in this three-part series:
- Toothpastes & Mouthwashes: Which Help And Which Harm?
- Flossing Without Flossing?
- Less Common Oral Hygiene Options ← we recommend the miswak! Not only does it clean the teeth as well as or better than traditional brushing, but also it changes the composition of saliva to improve the oral microbiome, effectively turning your saliva into a biological mouthwash that kills unwanted microbes and is comfortable for the ones that should be there.
In fact, caring for the composition of one’s saliva, and thus one’s oral microbiome, is so important that we did a main feature on that, a little later:
Make Your Saliva Better For Your Teeth ← this is especially important if you take any meds that affect the composition of your saliva (scroll down to the table of meds). Your medications’ leaflets won’t tell you that it does that directly, but they will list “dry mouth” as one of the potential side effects (and you’ll probably know if you have a medication that gives you a dry mouth).
Next, level up
For this one, we’ll drop some links to some videos we’ve featured (for those who prefer text, worry not, your faithful writer has added text-based overviews):
- How To Regrow Receding Gums
- Tooth Remineralization: How To Heal Your Teeth Naturally
- Tartar Removal At Home & How To Prevent Tartar
Now, that last one sounds slightly more exciting than it is—it is about using chemical processes to gradually lessen the tartar over time, with a six-month timeframe.
So, what if you want to do one better than that?
Finally… Buckle up, this one’s fun
Ok, so “fun” and “dental care” don’t usually go hand-in-hand, and maybe your sense of fun differs from this writer’s, but hey. The thing is, we’re going to get hands-on with dental tools.
Specifically, these dental tools:
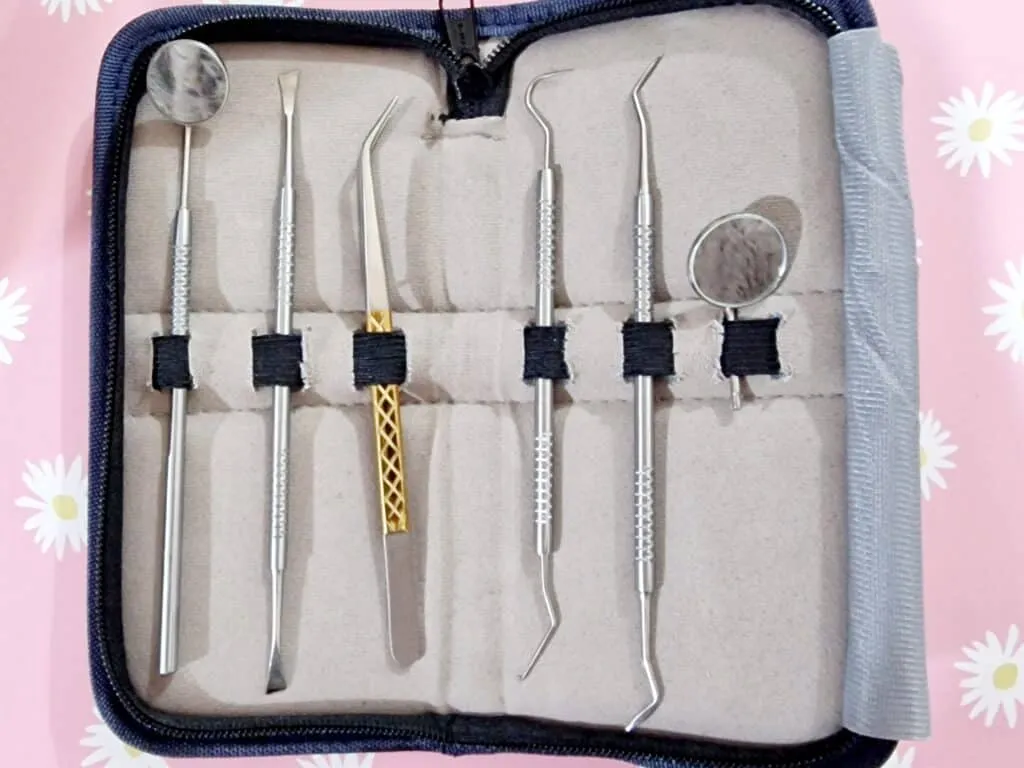
👆 these are literally the tools this writer has; if you look in the specula (the round mirror bits), you can see the reflection of the fluffy gray bathrobe I was wearing when I took the picture!
You can get tools like these easily online; here’s an example product on Amazon; do also shop around of course, and we recommend checking the reviews to ensure good quality.
Writer’s story on why I have these: once upon a time, a wisdom tooth came through at 45°, ploughing through the molar next to it, which then needed removing.
However, my teeth have the interesting anatomical quirk that I have hooked/barbed roots, which does not make tooth extraction easy; it had to come out sidewise, and the process was somewhat bungled by an inexperienced dental surgeon.
When the anesthetic wore off, it was the most pain I’ve ever been in in my life.
After that, I wasn’t a very regular returner to the dentist, and in 2013, I fell into a very deep depression for unrelated reasons, and during that period, I got some plaque/tartar buildup on some of my teeth due to lack of care, that then just stayed until I decided to take care of it more recently, which I am happy to say, I’ve now done (my teeth are the happiest and healthiest they’ve ever been), and I’m going to share how, with you.
So, here’s how to do it… First, you’ll need those tools, of course.
You will also want a good quality backlit magnifying mirror. Again, here’s an example product on Amazon ← this is the exact kind this writer has, and it’s very good.
You may be thinking: “wait a minute, this is scary, those are dangerous and I’m not a dentist!”
If so, then a few quick things to bear in mind:
- If you’re not comfortable doing it, don’t do it. As ever, our medical/legal disclaimer applies, and we share information for your interest only, and not as an exhortation to take any particular action. By all means confer with your dentist, too, and see whether they support the idea.
- These things do look scarier than they are once you get used to them. Do you use metal silverware when eating? Technically you could stab yourself with a fork any time, or damage your teeth with it, but when was the last time you did that?
- With regard to manual dexterity, if you have the manual dexterity required to paint your nails, floss your teeth, sew by hand, or write with a pen, then you have the manual dexterity to do this, too.
Now, about the tools:
- Speculum / magnifying speculum: the one with the mirror. This is useful for looking at the backs of teeth.
- Tweezers: the one with the gold grip in the photo above. You probably won’t need to use these, but we’re sure you know how to use tweezers in general.
- Dental explorer: the one with the big wicked-looking hook on one end, and a tiny (almost invisible in the photo) hook on the other end. This is for examining cavities, not for manipulating things. Best leave that to your dentist if you have cavities.
- Dental pick: this is the one to the right of the dental explorer, and it is for cleaning in the crevices between teeth. One end is quite blunt; the other is pointier, and you can choose which end to use depending on what fits into the shape of the crevice between your teeth.
- Dental scraper: this is the one with chisel ends. One end curves very slightly to the left, the other, very slightly to the right. This is for ergonomics depending on which hand you’re using, and which side you’re scraping (you’ll become very aware that your teeth, even if they look straight, curve very slightly at the edges.
You’ll be using these last two for the actual tartar removal, selecting the tool appropriate to cleaning the flat surface of a tooth, or the crevice where the teeth meet (not like flossing! That part, yes, but under no circumstances is this thing going all the way through to the other side, it’s just for getting into to nook that the scraper can’t so easily clean, that’s all).
A word on using metal against your teeth: a scary prospect, initially! However…
While steel is indeed harder than the enamel of your teeth, the enamel of your teeth is much harder than the plaque/tartar/calculus that you will be removing. Therefore, the technique to use is very gently scrape, starting as gently as humanly possible until you get a feel for it.
Unlike the dentist, you will have an advantage here in that you have biofeedback, and bone conduction of the sounds in your mouth, so you can exercise much more restraint than your dentist can. With the correct minimum of pressure, the tool should glide smoothly down enamel, but when it’s scraping tartar, it should make a very fine sandpapery noise.
This is why “or write with a pen” was one of the skills we mentioned earlier; it’s the same thing; you don’t press with a pen so hard that it goes through the paper, so don’t press so hard with the tool that it damages your enamel, that’s all.
Because of the differential in hardness between the tartar and the enamel, it’s really very easy to remove the tartar without harming the enamel, provided one is gentle.
Final word of warning; we’ll repeat: If you’re not comfortable doing it, don’t do it. As ever, our medical/legal disclaimer applies, and we share information for your interest only, and not as an exhortation to take any particular action. By all means confer with your dentist, too, and see whether they support the idea.
Also, while this kind of cleaning can be done safely at home, we recommend against doing anything more complicated than that.
See for example: Can You Repair Your Own Teeth At Home? ← the short answer is “no”, or not beyond tooth remineralization, anyway, and kits that say otherwise are potentially misleading, or stop-gap solutions at best.
One last time: always consult with a professional and get their advice (ours is not advice; it’s just information).
Take care!
Don’t Forget…
Did you arrive here from our newsletter? Don’t forget to return to the email to continue learning!

Learn to Age Gracefully
Join the 98k+ American women taking control of their health & aging with our 100% free (and fun!) daily emails: