Heart Smarter for Women – by Dr. Jennifer Mieres
10almonds is reader-supported. We may, at no cost to you, receive a portion of sales if you purchase a product through a link in this article.
Dr. Mieres takes us through understanding our own heart disease risks as individuals rather than as averages. As the title suggests, she does assume a female readership, so if you are a man and have no female loved ones, this might not be the book for you. But aside from that, she walks us through examining risk in the context of age, other health conditions, lifestyle factors, and so forth—including not turning a blind eye to factors that might intersect, such as for example if a physical condition reduces how much we can exercise, or if there’s some reason we can’t follow the usual gold standard of heart-healthy diet.
On which note, she does offer dietary advice, including information around recipes, meal-planning, and what things to always have in stock, as well as what things matter the most when it comes to what and how we eat.
It’s not all lifestyle medicine though; Dr. Mieres gives due attention to many of the medications available for heart health issues—and the pros and cons of these.
The style of the book is very simple and readable pop-science, without undue jargon, and with a generous glossary. As with many books of this genre, it does rely on (presumably apocryphal) anecdotes, though an interesting choice for this book is that it keeps a standing cast of four recurring characters, each to represent a set of circumstances and illustrate how certain things can go differently for different people, with different things then being needed and/or possible. Hopefully, any given reader will find themself represented at least moderately well somewhere in or between these four characters.
Bottom line: this is a very informative and accessible book, that demystifies a lot of common confusions around heart health.
Click here to check out Heart Smarter For Women, and take control of your health!
Don’t Forget…
Did you arrive here from our newsletter? Don’t forget to return to the email to continue learning!
Recommended
Learn to Age Gracefully
Join the 98k+ American women taking control of their health & aging with our 100% free (and fun!) daily emails:
-

5 Chair Exercises For Stronger Hips & Easier Walking

10almonds is reader-supported. We may, at no cost to you, receive a portion of sales if you purchase a product through a link in this article.
Sitting doesn’t have to be all bad:
Are you sitting comfortably?
Then we’ll begin:
- Seated march: sit tall in a firm chair, and lift your knees (alternating one and then the other and repeat), keeping your core engaged and avoiding leaning backwards; if needed, begin by lifting only your heels—this will still activate the fronts of your hips.
- Benefits: strengthens the hip flexors and core, helping with walking, taking larger steps, and overall hip function.
- Seated side step: sit near the edge of the chair, and move one knee and foot out to the side while keeping them aligned, then return to the starting position without letting your foot travel outside your knee. You can also put a resistance band above your knees, keeping light tension on the band throughout the movement, and continue stepping one leg out and back in under control.
- Benefits: improves inner-thigh mobility and strengthens the muscles on the sides of your hips that support walking, balance, and stair climbing.
- Pillow squeeze: put a pillow or ball between your knees, sit tall with your knees aligned over your ankles, gently squeeze the thing (whatever you chose), and then relax without letting your legs drift apart.
- Benefits: activates and strengthens your inner-thigh muscles while helping reduce feelings of groin and inner-thigh tightness.
- Heel push-down: sit near the edge of the chair with your knees bent, and press one heel firmly into the floor, feeling your glutes and the backs of your thighs contract before relaxing. You can also press both heels into the floor at the same time to create a stronger glute contraction while remaining seated.
- Benefits: strengthens your glutes and posterior hip muscles that assist with walking, climbing stairs, and general hip support.
- Straight leg raise: sit near the edge of the chair, straighten one leg with your toes pointing upwards, tighten your thigh by pressing your knee down, then lift and lower your leg slowly. If you need to make it easier, you can do a controlled kick-out instead of a full leg raise, or slide your heel forwards along the floor for additional support.
- Benefits: strengthens the fronts of your hips, your thighs, and your core, improving support for the front of the hip joint.
For more on all of this plus visual demonstrations, enjoy:
Click Here If The Embedded Video Doesn’t Load Automatically!
Want to learn more?
You might also like:
Stand Up For Your Health (Or Don’t) ← our main feature on this also includes more things you can do if you must sit, to make sitting less bad!
Take care!
Share This Post
- Seated march: sit tall in a firm chair, and lift your knees (alternating one and then the other and repeat), keeping your core engaged and avoiding leaning backwards; if needed, begin by lifting only your heels—this will still activate the fronts of your hips.
-

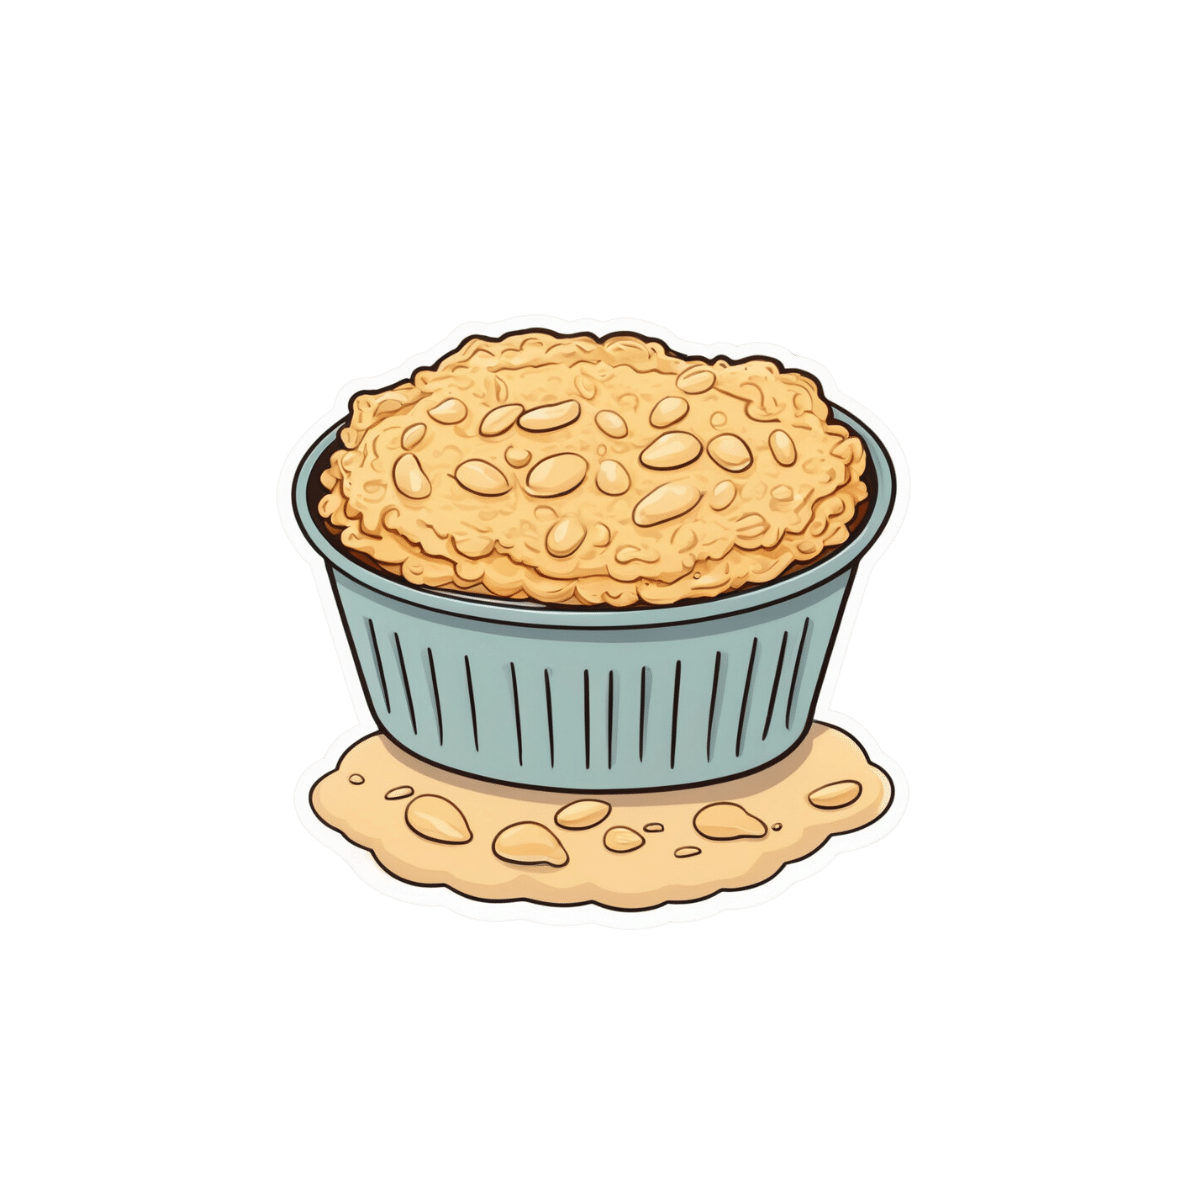
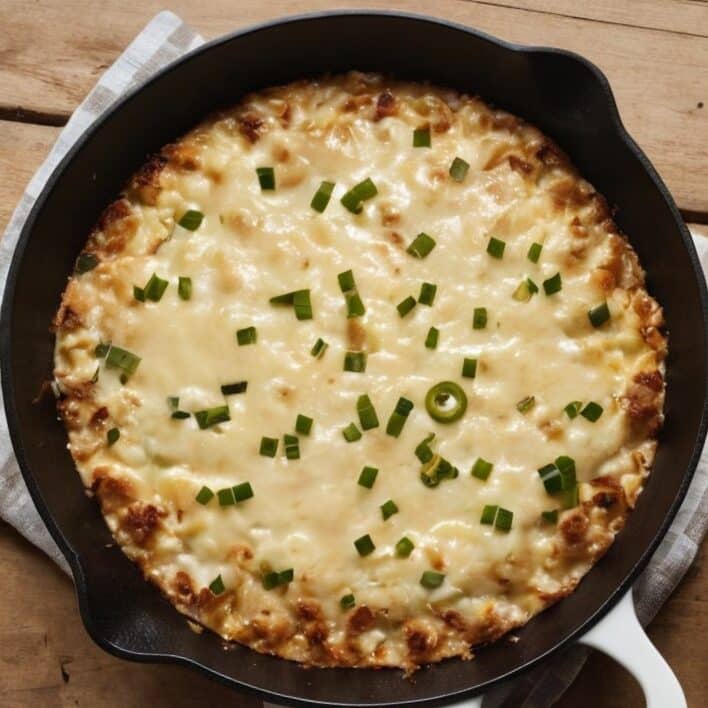
Cannellini Protein Gratin
10almonds is reader-supported. We may, at no cost to you, receive a portion of sales if you purchase a product through a link in this article.
A healthier twist on a classic, the protein here comes not only from the cannellini beans, but also from (at the risk of alienating French readers) a béchamel sauce that is not made using the traditional method involving flour and butter, but instead, has cashew protein as a major constituent.
You will need
- 3 medium potatoes, chopped (no need to peel them; you can if you want, but many of the nutrients are there and they’re not a problem for the recipe)
- 1 can cannellini beans (also called white kidney beans)
- 1 medium onion, chopped
- 2 stalks celery, sliced
- 1 carrot, chopped
- ½ bulb garlic, minced (or more, if you like)
- 1 jalapeño, chopped
- 2 tbsp tomato paste
- 1 tbsp chia seeds
- 2 tsp black pepper, coarse ground
- Extra virgin olive oil, for frying
For the béchamel sauce:
- ½ cup milk (we recommend a neutral-tasting plant milk, such as unsweetened soy, but go with your preference)
- ⅓ cup cashews, soaked in hot water for at least 5 minutes (longer is fine) and drained
- ¼ cup nutritional yeast
- 1 tsp garlic powder
- 1 tsp dried thyme
Method
(we suggest you read everything at least once before doing anything)
Note: it will be a bonus if you can use a pan that is good both for going on the hob and in the oven, such as a deep cast iron skillet, or a Dutch oven. If you don’t have something like that though, it’s fine, just use a sauté pan or similar, and then transfer to an oven dish for the oven part—we’ll mention this again when we get to it.
1) Preheat the oven to 250℉/175℃.
2) Heat the pan, adding some oil and then the oven; fry it for about 5 minutes, stirring often.
3) Add the potatoes, celery, carrot, garlic, and jalapeño, stirring for another 2 minutes.
4) Add the tomato paste, along with 1 cup water, the chia seeds, and the black pepper, and cook for a further 15 minutes, stirring occasionally as necessary.
5) Add the cannellini beans, and cook for another 15 minutes, stirring occasionally as necessary.
6) Blend all the ingredients for the béchamel sauce, processing it until it is smooth.
7) If you are using an oven-safe pan, pour the béchamel sauce over the bean mixture (don’t stir it; the sauce should remain on top) and transfer it to the oven. Don’t use a lid.
If you’re not using an oven safe pan, first transfer the bean mixture to an oven dish, then pour the béchamel sauce over the bean mixture (don’t stir it; the sauce should remain on top) and put it in the oven. Don’t use a lid.
8) Bake for about 15 minutes, or until turning golden-brown on top.
9) Serve! It can be enjoyed on its own, or with salad and/or rice. See also, our Tasty Versatile Rice Recipe.

Enjoy!
Want to learn more?
For those interested in some of the science of what we have going on today:
- What Matters Most For Your Heart?
- The Many Health Benefits Of Garlic
- Easily Digestible Vegetarian Protein Sources
- Is Dairy Scary?
- Cashew Nuts vs Coconut – Which is Healthier?
- Black Pepper’s Impressive Anti-Cancer Arsenal (And More)
Take care!
Share This Post
-

Hungry? How To Beat Cravings
10almonds is reader-supported. We may, at no cost to you, receive a portion of sales if you purchase a product through a link in this article.
The Science of Hunger, And How To Sate It

This is Dr. David Ludwig. That’s not a typo; he’s a doctor both ways—MD and PhD.
Henceforth we’ll just say “Dr. Ludwig”, though! He’s a professor in the Department of Nutrition at Harvard T.H. Chan School of Public Health, and director of the New Balance Foundation Obesity Prevention Center.
His research focuses on the effects of diet on hormones, metabolism, and body weight, and he’s one of the foremost experts when it comes to carbohydrates, glycemic load, and obesity.
Why are we putting on weight? What are we getting wrong?
Contrary to popular belief, Dr. Ludwig says, weight gain is not caused by a lack of exercise. In fact, people tend to overestimate how many calories are burned by exercise.
A spoonful of sugar may make the medicine go down, but it also contains 60 calories, and that’d take about 1,500 steps for the average person to burn off. Let’s put this another way:
If you walk 10,000 steps per day, that will burn off 400 calories. Still think you can exercise away that ice cream sundae or plate of fries?
Wait, this is interesting and all, but what does this have to do with hunger?
Why we get hungry
Two important things:
- All that exercise makes us hungry, because the more we exercise, the more the body speeds up our metabolism accordingly.
- Empty calories don’t just add weight themselves, they also make us hungrier
What are empty calories, and why do they make us hungrier?
Empty calories are calories that are relatively devoid of other nutrition. This especially means simple sugars (especially refined sugar), white flour and white flour products (quick-release starches), and processed seed oils (e.g. canola, sunflower, and friends).
They zip straight into our bloodstream, and our body sends out an army of insulin to deal with the blood sugar spike. And… that backfires.
Imagine a person whose house is a terrible mess, and they have a date coming over in half an hour.
They’re going to zoom around tidying, but they’re going to stuff things out of sight as quickly and easily as possible, rather than, say, sit down and Marie Kondo the place.
But superficially, they got the job done really quickly!
Insulin does similarly when overwhelmed by a blood sugar spike like that.
So, it stores everything as fat as quickly as possible, and whew, the pancreas needs a break now after all that exertion, and the blood is nice and free from blood sugars.
Wait, the blood is what now?
The body notices the low blood sugar levels, and it also knows you just stored fat so you must be preparing for starvation, and now the low blood sugar levels indicate starvation is upon us. Quick, we must find food if we want to survive! So it sends a hunger signal to make sure you don’t let the body starve.
You make a quick snack, and the cycle repeats.
Dr. Ludwig’s solution:
First, we need to break out of that cycle, and that includes calming down our insulin response (and thus rebuilding our insulin sensitivity, as our bodies will have become desensitized, after the equivalent of an air-raid siren every 40 minutes or so).
How to do that?
First, cut out the really bad things that we mentioned above.
Next: cut healthy carbs too—we’re talking unprocessed grains here, legumes as well, and also starchy vegetables (root vegetables etc). Don’t worry, this will be just for a short while.
The trick here is that we are resensitizing our bodies to insulin.
Keep this up for even just a week, and then gradually reintroduce the healthier carbs. Unprocessed grains are better than root vegetables, as are legumes.
You’re not going to reintroduce the sugars, white flour, canola oil, etc. You don’t have to be a puritan, and if you go to a restaurant you won’t undo all your work if you have a small portion of fries. But it’s not going to be a part of your general diet.
Other tips from Dr. Ludwig:
- Get plenty of high-quality protein—it’s good for you and suppresses your appetite
- Shop for success—make sure you keep your kitchen stocked with healthy easy snack food
- Nuts, cacao nibs, and healthy seeds will be your best friends and allies here
- Make things easy—buy pre-chopped vegetables, for example, so when you’re hungry, you don’t have to wait longer (and work more) to eat something healthy
- Do what you can to reduce stress, and also eat mindfully (that means paying attention to each mouthful, rather than wolfing something down while multitasking)
If you’d like to know more about Dr. Ludwig and his work, you can check out his website for coaching, recipes, meal plans, his blog, and other resources!
Share This Post


Related Posts
-

Gut-Healthy Spaghetti Chermoula
10almonds is reader-supported. We may, at no cost to you, receive a portion of sales if you purchase a product through a link in this article.
Chermoula is a Maghreb relish/marinade (it’s used for both purposes); it’s a little like chimichurri but with distinctly N. African flavors. The gut-healthiness starts there (it’s easy to forget that olives—unless fresh—are a fermented food full of probiotic Lactobacillus sp. and thus great for the gut even beyond their fiber content), and continues in the feta, the vegetables, and the wholewheat nature of the pasta. The dish can be enjoyed at any time, but it’s perfect for warm summer evenings—perhaps dining outside, if you’ve place for that.
You will need
- 9oz wholewheat spaghetti (plus low-sodium salt for its water)
- 10oz broccoli, cut into small florets
- 3oz cilantro (unless you have the soap gene)
- 3oz parsley (whether or not you included the cilantro)
- 3oz green olives, pitted, rinsed
- 1 lemon, pickled, rinsed
- 1 bulb garlic
- 3 tbsp pistachios, shelled
- 2 tbsp mixed seeds
- 1 tsp cumin
- 1 tsp chili flakes
- ½ cup extra virgin olive oil
- For the garnish: 3oz feta (or plant-based equivalent), crumbled, 3oz sun-dried tomatoes, diced, 1 tsp cracked black pepper
Note: why are we rinsing the things? It’s because while picked foods are great for the gut, the sodium can add up, so there’s no need to bring extra brine with them too. By doing it this way, there’ll be just the right amount for flavor, without overdoing it.
Method
(we suggest you read everything at least once before doing anything)
1) Cook the spaghetti as you normally would, but when it’s a minute or two from being done, add the broccoli in with it. When it’s done, drain and rinse thoroughly to get rid of excess starch and salt, and also because cooling it even temporarily (as in this case) lowers its glycemic index.
2) Put the rest of the ingredients into a food processor (except the olive oil and the garnish), and blitz thoroughly until no large coarse bits remain. When that’s done, add the olive oil, and pulse it a few times to combine. We didn’t add the olive oil previously, because blending it so thoroughly in that state would have aerated it in a way we don’t want.
3) Put ⅔ of the chermoula you just made into the pan you used for cooking the spaghetti, and set it over a medium heat. When it starts bubbling, return the spaghetti and broccoli to the pan, mixing gently but thoroughly. If the pasta threatens to stick, you can add a little more chermoula, but go easy on it. Any leftover chermoula that you didn’t use today, can be kept in the fridge and used later as a pesto.
4) Serve! Add the garnish as you do.
Enjoy!
Want to learn more?
For those interested in some of the science of what we have going on today:
- Less Obvious Probiotics Benefits
- Making Friends With Your Gut (You Can Thank Us Later)
- What Matters Most For Your Heart? ← spoiler: this is why, while we do watch the sodium, we care more about the fiber
- All about Olive Oil: Is “Extra Virgin” Worth It?
- Our Top 5 Spices: How Much Is Enough For Benefits?
Take care!
Don’t Forget…
Did you arrive here from our newsletter? Don’t forget to return to the email to continue learning!
Learn to Age Gracefully
Join the 98k+ American women taking control of their health & aging with our 100% free (and fun!) daily emails:
-
Arugula vs Spinach – Which is Healthier?
10almonds is reader-supported. We may, at no cost to you, receive a portion of sales if you purchase a product through a link in this article.
Our Verdict
When comparing arugula to spinach, we picked the spinach.
Why?
Both are great, but there’s a clear winner here:
In terms of macros, spinach has more fiber and protein for the same carbs, scoring an easy first-round win.
In the category of vitamins, arugula has more vitamin B5 (that is, the vitamin that’s in nearly all foods and in which it’s almost impossible to be deficient unless literally starving to death), while spinach has more of vitamins A, B1, B2, B3, B6, B7, B9, C, E, and K, winning its second round convincingly.
Looking at minerals, arugula’s a little higher in calcium, while spinach has more copper, iron, magnesium, manganese, potassium, selenium, and zinc, for another clear win.
In other considerations, spinach is much higher in oxalates, which is a non-issue for most people, but if you have certain kidney disorders, you might want to avoid those, so it’s worth knowing.
In any case, adding up the sections makes for a clear overall win for spinach, but by all means enjoy either or both, unless you need to avoid oxalates, in which case, arugula is on the menu for you!
Want to learn more?
You might like:
Make Your Vegetables Work Better Nutritionally ← there are a lot of tips here for many kinds of foods and kinds of cooking/preparation, including that cooking (any kind) reduces oxalates by breaking them down; not so useful if you want a leafy salad, but good for other purposes!
Enjoy!
Don’t Forget…
Did you arrive here from our newsletter? Don’t forget to return to the email to continue learning!
Learn to Age Gracefully
Join the 98k+ American women taking control of their health & aging with our 100% free (and fun!) daily emails:
-
Why Not To Be A Night Owl After 40
10almonds is reader-supported. We may, at no cost to you, receive a portion of sales if you purchase a product through a link in this article.
It’s often assumed that being an “early bird” or a “night owl” is purely a matter of genetic predisposition, and… There is indeed a genetic influence, but as it is said, “genes predispose; they don’t predetermine“.
We discussed this in detail, here: Early Bird Or Night Owl? Genes vs Environment
With that in mind, being a night owl is, for most of us, largely a modifiable thing. Some people, of course, will have things going on in their life that preclude getting an early night’s sleep, but if that’s not the case for you, then we do recommend considering shifting your chronotype to being an “early bird”, if it’s not already there.
For more about chronotypes in general, see: 5 Sleep Phenotypes, By Actual Science (Sleep Tracking, For Five Million Nights)
Why does it matter?
A team of researchers (Dr. Ana Wenzler et al.) did a large (n=23,798) study and found that night owls face a higher risk of cognitive decline compared to morning people.
As to why “after 40”, there are two reasons:
- Biological clocks shift throughout life: people tend to be morning types in childhood, shift to evening types in adolescence, and most, but far from all, return to morning preference by around age 40.
- Cognitive decline naturally begins most commonly after age 40, and lifestyle factors influence this process.
For this reason, the study used data from people over the age of 40, to analyze people’s chronotypes (natural sleep patterns) and their behavior over a 10-year period.
As to how much being a night owl affects the risk of cognitive decline; it was broken down by demographics, but for example in the group with the highest education level:
❝each one-hour increase in chronotype corresponded to a 0.80-point decline in cognition per decade (95 % CI: -1.34, -0.26)❞
The “night owl” chronotype was also associated with greater decline in non-verbal fluency and executive functioning among higher educated participants, highlighting the importance of targeted prevention strategies.
In terms of potentially confounding (although also relevant) factors, night owls tend to engage more in unhealthy behaviors such as smoking, drinking, poor diet, and lack of exercise—especially in the evening.
You may be thinking: “I don’t do those things”, in which case, great! But the researchers also calculated that those behaviors explain only about 25% of the cognitive decline risk among night owls.
You can read the paper in full, here: Chronotype as a potential risk factor for cognitive decline: The mediating role of sleep quality and health behaviours in a 10-year follow-up study
How should we fix it?
If you’re currently a night owl, chances are you physically cannot currently sleep earlier than you do—your brain just isn’t ready to sleep yet at the earlier hour.
What you can control, however, is your getting-up time. So, shift that earlier—gently! 15 minutes earlier per day is great—and your “getting sleepy time” in the evening will naturally shift commensurately earlier.
For reference, see also: Calculate (And Enjoy) The Perfect Night’s Sleep
Take care!
Don’t Forget…
Did you arrive here from our newsletter? Don’t forget to return to the email to continue learning!
Learn to Age Gracefully
Join the 98k+ American women taking control of their health & aging with our 100% free (and fun!) daily emails: