Don’t throw it out! How to cook using ingredients too good to waste
10almonds is reader-supported. We may, at no cost to you, receive a portion of sales if you purchase a product through a link in this article.
Australians are feeling the pressure of rising grocery prices. At the same time, we throw away huge amounts of perfectly edible food every year.
Some food spoils before we can use it. But we waste plenty of food by throwing away parts of ingredients we simply don’t think to use.
Many of these leftovers are nutritious, tasty and surprisingly versatile. So using more of what you already buy can help stretch your grocery budget further while reducing waste.
Here are some everyday ingredients people often throw away, along with tips for how to use them.
Broccoli stems and leek tops
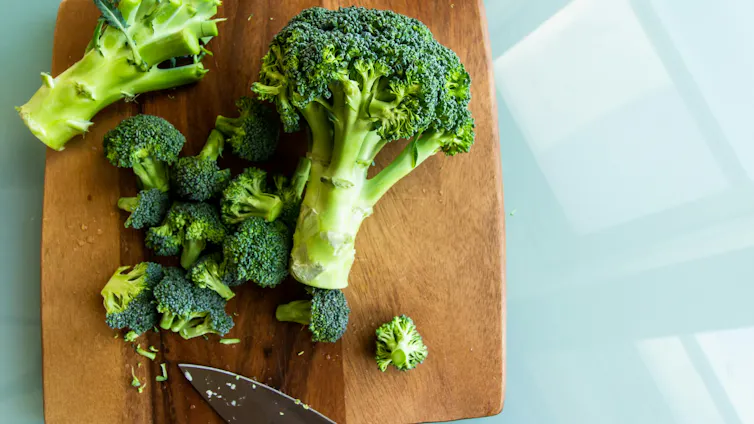
Many people trim off broccoli stems and only eat the florets, but you can eat the stems and leaves too.
To use the stems, peel away the tougher outer layer and slice the tender part inside.
The leaves can contain even higher levels of beneficial plant compounds than the florets, making them a nutritious addition to meals. You can use them in salads or sauté them like other leafy greens.
Try a broccoli stem and red pepper slaw, a broccoli leaf salad, crispy parmesan broccoli stem fries, or broccoli stem pesto.
When a recipe calls for leeks, it usually directs you to use only the white and light green parts, often suggesting you discard the tough, dark green tops. But these dark green tops are nutritious, containing natural plant compounds that support health. This includes compounds linked to reducing inflammation, protecting cells and fighting bacteria.
There are many simple ways to use leek tops. You can add them to leek and potato soup, or include them in dishes such as caramelised leek pasta. Adding them to vegetable or chicken stock adds depth of flavour.
Herb stems
Herb stems are often overlooked and thrown away, yet can be just as flavourful as the leaves. You can finely chop soft stems from herbs such as coriander, parsley and dill to add to curries, soups, sauces, marinades and dressings. Choose stems that are fresh and tender for the best flavour.
Woody stems from herbs such as rosemary, thyme and basil may be too tough or bitter to eat, but you can still use them. Soak in water to soften them, then add to smoked meat or fish to infuse flavour. You can use woody stems as skewers for grilling.
Even after herb leaves have wilted, you can still often use the stems. Rinse, dry and seal them in a bag before storing them in the freezer. You can chop them straight from frozen and add them to soups, stews and curries.
Chicken carcasses and crispy skins
A roast chicken, whether store-bought or home-cooked, can stretch far beyond a single meal.
Simmer the leftover carcass with vegetables and herbs to make a rich stock for soups, risottos and casseroles. You can also use chicken bones to make broth, forming the base of dishes such as pho, ramen or a simple noodle soup.
Chicken skin is another often-discarded ingredient. Cook it until crisp to use as a savoury garnish for soups, salads or grain bowls. Because it is high in saturated fat it’s best enjoyed in moderation.
Fish skin can also be transformed into a crispy topping when baked or pan-fried, adding texture to dishes such as rice bowls or salads.
The liquid in bean cans has a name – aquafaba
The liquid inside canned chickpeas or beans is called aquafaba. It contains starches and proteins that allow it to function like egg whites in cooking.
Aquafaba is often used in vegan baking to replace eggs. While it’s not particularly high in protein, it can be whipped into meringues, fluffy pancakes, chocolate mousse and mayonnaise.
You can also use it to help thicken soups and stews.
Stale bread and crusts still have plenty of life
Bread is one of the most commonly wasted foods in Australian households, but it doesn’t have to be.
You can use stale bread in meals such as strata (a baked egg dish) or other savoury egg bakes.
Fry or bake torn pieces of stale bread to make croutons for soups and salads. You can also use torn pieces in dishes such as panzanella – an Italian bread salad including tomatoes and fresh herbs.
Make breadcrumbs from stale bread and crusts to coat schnitzels and eggplant parmigiana, or to sprinkle on pasta for extra texture.
You can also use stale bread in sweet dishes, such as chocolate and banana French toast or bread and butter pudding.
One important caveat
If food smells off, is mouldy beyond a small removable spot, or has been left at unsafe temperatures, it’s safest to throw it away.
The aim is not to encourage risky eating. It’s about recognising that many parts of foods we routinely discard are still nutritious, safe and useful.
Lauren Ball, Professor of Community Health and Wellbeing, The University of Queensland and Emily Burch, Accredited Practising Dietitian and Lecturer, Southern Cross University
This article is republished from The Conversation under a Creative Commons license. Read the original article.
Don’t Forget…
Did you arrive here from our newsletter? Don’t forget to return to the email to continue learning!
Recommended
Learn to Age Gracefully
Join the 98k+ American women taking control of their health & aging with our 100% free (and fun!) daily emails:
-
What Happens To Your Body When You Stop Drinking Alcohol
10almonds is reader-supported. We may, at no cost to you, receive a portion of sales if you purchase a product through a link in this article.
Immediately after we stop drinking is rarely when we feel our best. But how long is it before we can expect to see benefits, instead of just suffering?
Timeline
After stopping drinking alcohol for…
- Seconds: the liver starts making progress filtering out toxins and sugars; ethanol starts to leave the system
- 1 hour: fatigue sets in as the body uses a lot of energy to metabolize and eliminate alcohol. However, sleep quality (if one goes to sleep now) is low because alcohol disrupts the brain patterns required for restful sleep
- 6–12 hours: the immune system starts recovering from the suppression caused by alcohol
- 24 hours: immune system is back to normal; withdrawal symptoms may occur in the case of heavy drinkers
- 3–5 days: resting blood pressure begins to drop, as stress levels decrease (alcohol may seem anxiolytic, but it is actually anxiogenic; it just masks its own effect in this regard). Also, because of insulin responses improving, appetite reduces. The liver, once it has finished dealing your last drinking session (if you used to drink all the time, it probably had a backlog to clear), can now begin to make repairs on itself.
- 1 week: skin will start looking better, as antidiuretic hormone levels neutralize, leading to a healthier maintenance of hydration
- 2 weeks: cognitive abilities improve as the brain begins to make progress in repairing itself. At the same time, kidneys start to heal.
- 3–4 weeks: the liver begins to regenerate in earnest. You may wonder what took it so long given the liver’s famous regenerative abilities, but in this case, the liver was also the organ that took the most damage from drinking, so its regeneration gets off to a slow start (in contrast, if the liver had “merely” suffered physical trauma, such as being shot, stabbed,
or eaten by eagles,it’d start regenerating vigorously as soon as the immediate wound-response had been tended to). Once it is able to pick up the pace though, overall health improves, as the liver can focus on breaking down other toxins. - 1–2 months: the heart is able to repair itself, and start to become stronger again (dependent on other lifestyle factors, of course).
- 3 months and more: bodily repairs continue (for example, the damage to the liver is often so severe that it can take quite a bit longer to recover completely, and repairs in the brain are always slow, for reasons beyond the scope of this article). Looking at the big picture, at this point we also see other benefits, such as reduced cancer risks.
In short… It’s never too soon to stop, but it’s also never too late, unless you are going to die in the next few days. So long as you’ll be in the land of the living for a few days yet, there’s time to enjoy the benefits of stopping.
Most importantly: the timeline for the most important repairs is not as long as many people might think, and that itself can be very motivating.
For more detail on much of the above, enjoy:
Click Here If The Embedded Video Doesn’t Load Automatically!
Want to learn more?
You might also like to read:
- Can We Drink To Good Health?
- How To Reduce Or Quit Alcohol
- Addiction Myths That Are Hard To Quit
- How To Unfatty A Fatty Liver
Take care!
Share This Post
-
5 Hip Exercises To Strengthen Bones & Improve Balance (Osteoporosis-Friendly)
10almonds is reader-supported. We may, at no cost to you, receive a portion of sales if you purchase a product through a link in this article.
Today’s video choice was inspired by: your writer here just got back from the radiology clinic where she had her hips and spine scanned for bone density (I get the results in a week; wish me luck!).
This is an important topic, because…
- Bad news: hip fractures are common in adults over 50 and can lead to long recovery and loss of independence (or indeed, loss of life; too many people go into hospital with a broken hip, get an infection in hospital, and don’t come home)
- Good news: consistent, targeted exercises can strengthen bones and joints to reduce fracture risk and maintain an active, confident lifestyle (and indeed, one conducive to healthy longevity)
Dr. Alyssa Kuhn explains:
Use it or lose it
Dr. Kuhn recommends the following exercises:
- Side stomp: this gentle impact exercise involves stepping to the side and stomping to stimulate bone strengthening, with adjustable intensity and optional upper body support, aiming for 10–15 stomps per side.
- Weighted squat: you can strengthen your leg muscles and bones by doing controlled squats with or without weights (held at shoulder level), keeping an upright posture, avoiding forward bending, and placing weights on a raised surface to prevent unsafe lifting; aim for 10–12 reps, 2–3 sets.
- Heel drops: raise up onto your toes and let your heels drop to create vertical impact for bone strength, starting gently and increasing intensity gradually on soft surfaces or barefoot if comfortable, with a goal of 10–20 reps, 2–3 sets.
- Tandem walking: walk heel-to-toe in a straight line to challenge balance and lower fall risk, using a wall or counter for support and adjusting foot spacing if needed, aiming for 1–2 minutes per round, 2–3 rounds, focusing on control over speed.
- Hop (jumping): begin with supported hops to test readiness, then progress to controlled free jumps that keep knees aligned and hips engaged on landing to safely build hip bone strength, starting with 10–20 reps, 2–3 sets, and increasing gradually.
Find a way to build them (or at least: one or more of them) into your daily routine. A good example, since these are quite “casual” exercises and not the kind for which one necessarily gets changed and/or goes to the gym, is to do some of these while waiting for water to boil, or for the microwave, or things like that.
For more on each of these plus visual demonstrations, enjoy:
Click Here If The Embedded Video Doesn’t Load Automatically!
Want to learn more?
You might also like:
21% Stronger Bones in a Year at 62? Yes, It’s Possible (No Calcium Supplements Needed!)
Take care!
Share This Post
-
10-Minute Routine To Fix Lower Back Pain
10almonds is reader-supported. We may, at no cost to you, receive a portion of sales if you purchase a product through a link in this article.
Mobility coach and former professional gymnast Alisa Zuravskaja shows us how:
The safer way to do it
It’s about gently mobilizing one thing and then the next in line, in a progressive sequence:
- Spinal decompression and breathwork: start in child’s pose, relax your neck and shoulders, and breathe deeply into your belly to encourage relaxation and spinal decompression.
- Spine mobility and hip flexor stretch: flow slowly between child’s pose and cobra to mobilize your spine, open your chest, and counter the posture associated with prolonged sitting.
- Cat-cow: move slowly through spinal flexion and extension, bringing movement to your spine, lower back, hip flexors, neck, and shoulders.
- Thread the needle: rotate through your upper back to improve thoracic mobility, which can help reduce stiffness and offload your lower back.
- Kneeling hip flexor stretch: squeeze your glutes, keep your hips facing forwards, and gently move your pelvis forwards to stretch your hip flexors. Raise your arm for a deeper stretch. If kneeling is uncomfortable for you, there’s a standing version also shown in the video!
- 90/90 hip shifts: alternate your knees from side to side to improve hip internal and external rotation. Work within a comfortable range and reduce the movement or stop if you experience pain.
- Deep core activation: lying on your back, brace your core while slowly lowering one heel toward the floor at a time. Keep your lower back pressed firmly against the floor; you can reduce your range of motion if needed, but do go as far as you comfortably can.
- Figure-four glute stretch: cross one ankle over your opposite thigh and draw the position toward your chest for a deeper stretch. Follow with a gentle rotation to further mobilize your hips, spine, and glutes. Repeat on the other side.
- Glute activation: do a glute bridge with your toes lifted so your weight stays on your heels, emphasizing your glutes and posterior chain.
- Knees-to-chest stretch: bring both knees toward your chest to stretch your glutes and hamstrings and gently mobilize your lower back. Gently shift from side to side, too. That’s all!
For more on all of this plus visual demonstrations, enjoy:
Click Here If The Embedded Video Doesn’t Load Automatically!
Want to learn more?
For a much deeper understanding of treating back pain, here’s a great book that we reviewed a little while back:
Treat Your Own Back – by Robin McKenzie ← he’s a physiotherapist and not a doctor, and/but with 40 years of practice to his name and 33 letters after his name (CNZM OBE FCSP (Hon) FNZSP (Hon) Dip MDT Dip MT), he seems to know his stuff. His work is very well-respected, and almost any English-speaking physiotherapist will have read his books.
Take care!
Share This Post
Related Posts
-
Sensitive – by Jenn Granneman and Andre Sólo
10almonds is reader-supported. We may, at no cost to you, receive a portion of sales if you purchase a product through a link in this article.
This book is written for what is called the “Highly Sensitive Person”, which makes it sound like a very rare snowflake condition, when in fact the diagnostic criteria (discussed early in the book) yield a population bell curve of 30:40:30, whereupon 30% are in the band of “high sensitivity”, 40% “normal sensitivity” and the remainder “low sensitivity”. You may note that “high” and “low” together outnumber “normal”, but statistics is like that.
So, if you’re one of the approximately one in three people who fall into the higher category, and/or you have a loved one who is in that category, then this book looks at the many advantages to a commonly stigmatized and (by cruel irony) criticized personality trait.
Those advantages range from personal life to work and even public life (yes, really), and can be grown, positively highlighted, used, and enjoyed.
In the category of criticism, the book does not usefully cover the benefit of psychological resilience. Resilience does not mean losing sensitivity, just, being able to also dry one’s tears and weather life’s slings and arrows when the world is harsher than one might like. But for the authors, they have stacked all their chips on “we must make the world a better place”. Which is a noble goal, if not always an immediately attainable one.
Bottom line: if you are more sensitive than average and would like to use that to benefit yourself and those around you, then this is the book for you!
Click here to check out Sensitive, and make the most of your strengths!
Don’t Forget…
Did you arrive here from our newsletter? Don’t forget to return to the email to continue learning!
Learn to Age Gracefully
Join the 98k+ American women taking control of their health & aging with our 100% free (and fun!) daily emails:
-
Hold Me Tight – by Dr. Sue Johnson
10almonds is reader-supported. We may, at no cost to you, receive a portion of sales if you purchase a product through a link in this article.
A lot of relationship books are quite wishy-washy. This one isn’t.
This one is evidenced-based (and heavily referenced!), and yet at the same time as being deeply rooted in science, it doesn’t lose the human touch.
Dr. Johnson has spent her career as a clinical psychologist and researcher; she’s the primary developer of Emotionally Focused Therapy (EFT), which has demonstrated its effectiveness in over 35 years of peer-reviewed clinical research. In other words, it works.
EFT—and thus also this book—finds roots in Attachment Theory. As such, topics this book covers include:
- Recognizing and recovering from attachment injury
- How fights in a relationship come up, and how they can be avoided
- How lot of times relationships end, it’s not because of fights, but a loss of emotional connection
- Building a lifetime of love instead, falling in love again each day
This book lays the groundwork for ensuring a strong, secure, ongoing emotional bond, of the kind that makes/keeps a relationship joyful and fulfilling.
Dr. Johnson has been recognized in her field with a Lifetime Achievement Award, and the Order of Canada.
Don’t Forget…
Did you arrive here from our newsletter? Don’t forget to return to the email to continue learning!
Learn to Age Gracefully
Join the 98k+ American women taking control of their health & aging with our 100% free (and fun!) daily emails:
-
The “Barrier-First” Way to Layer Skincare in Winter
10almonds is reader-supported. We may, at no cost to you, receive a portion of sales if you purchase a product through a link in this article.
Dr. Shereene Idris, dermatologist, explains:
Layer up
We’re not sure why she called this the “barrier-first” way, as the barrier does appear to be last (maybe she meant it in the “it’s most important” way, or maybe she was referring to prioritizing the skin barrier; either are possible with the things she said, and neither are confirmed as being the reason).
In any case, the advice itself is sound:
Her advice is to think of skincare like winter clothing—start with the thinnest layers and build up only as needed, rather than using every possible layer by default.
Know the five hydration categories: lightweight mists, hydrating essences or toners, serums, moisturizers, and rich creams or occlusives, with the understanding that you do not necessarily need a product from every category (and in fact, you almost certainly don’t).
With that in mind, pick and mix from the following as appropriate, and/but in this order:
- Hydrating mist: adds surface water but must always be sealed with subsequent layers, otherwise evaporation can worsen dryness—similar to repeatedly licking dry lips.
- Hydrating essence or toner: choose products explicitly formulated to hydrate rather than exfoliate, and apply with light pressure to help cushion skin and improve receptivity to treatments.
- Serum: a hydrating serum can be used alone, or you can choose a targeted treatment serum that also contains humectants, allowing hydration and correction to happen simultaneously.
- Moisturizer: supports your skin barrier and comfort, with lighter options often working under sunscreen or makeup in the morning and richer textures becoming more appropriate as winter dryness increases.
- Rich cream or occlusive: seals everything in overnight to reduce water loss, with zinc-based options offering additional anti-inflammatory or barrier-support benefits when skin is irritated.
It’s also worth noting that your skin type and environment determine how many steps you need, and routines should ebb and flow with climate changes rather than remain rigid.
For more on all of this, enjoy:
Click Here If The Embedded Video Doesn’t Load Automatically!
Want to learn more?
You might also like:
Do We Need Sunscreen In Winter, Really?
Take care!
Don’t Forget…
Did you arrive here from our newsletter? Don’t forget to return to the email to continue learning!
Learn to Age Gracefully
Join the 98k+ American women taking control of their health & aging with our 100% free (and fun!) daily emails:


